
Automate guest messages with triggers
Turn a message template into an automatic message that goes out at the right moment, such as check-in instructions 1 day before arrival. The iGMS help centre says triggers can automate up to 70% of daily guest communication. You need at least one message template and the right time zone on each property.
AirbnbVrboBooking.comDirectBeginnerAbout 10 minutes per message
On this page
At a glance
| Time | About 10 minutes per message (estimate) |
|---|---|
| Difficulty | Beginner |
| Plan | Every plan: FLEX, PRO and PRO+ (compare plans) |
| Feature | Airbnb automation |
| Works with | Airbnb, Vrbo, Booking.com, Direct |
| Steps | 6 |
| Last checked | 19 November 2026, against the iGMS help centre |
What do you need before you start?
- At least one message template (see «Create message templates with guest details filled in»).
- The right time zone on each property: send times follow the property's time zone.
- Images in JPG, PNG or GIF up to 25 MB if you attach any. Share PDFs as a Google Drive link.
How do you automate guest messages with triggers?
Step 1 Open the template you want to automate
In the Inbox or the Property Editor, find the template and click the cog icon next to its name. The Template Editor opens.
Where
Inbox → template → cog iconStep 2 Switch on Automation and pick a trigger
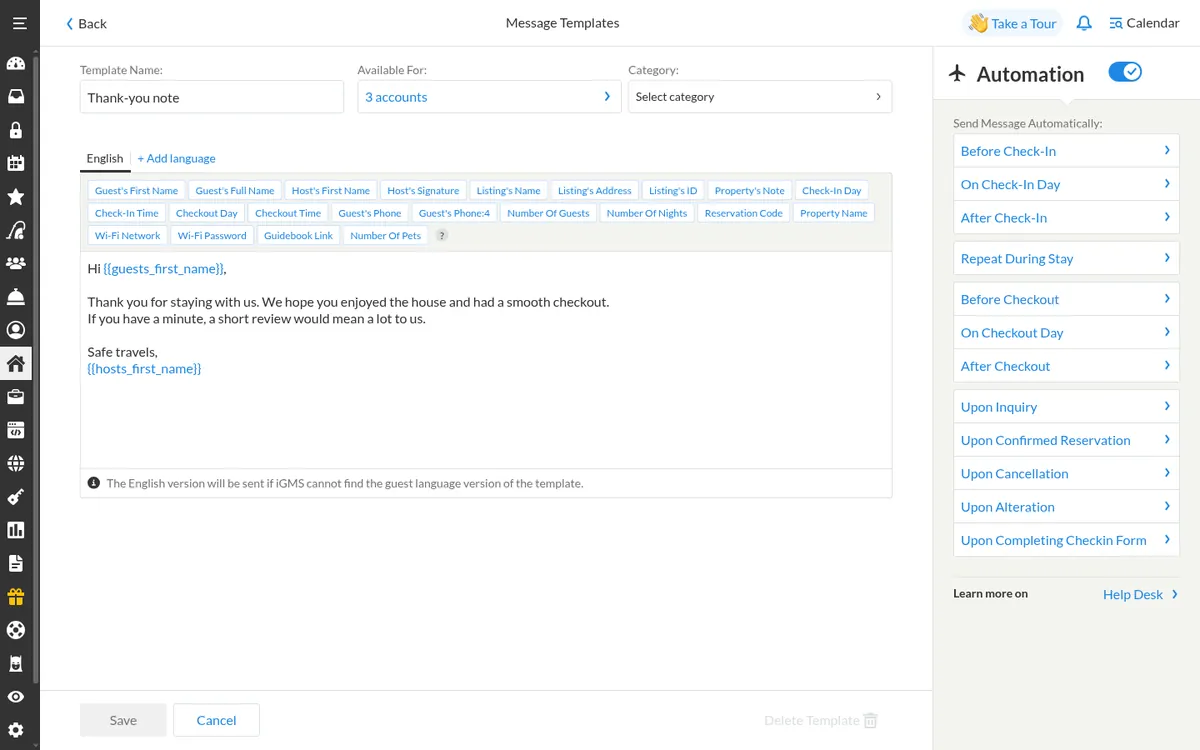
Turn on the Automation toggle and choose when the message goes out under «Send Message Automatically»: Before Check-In, On Check-In Day, After Check-In, Repeat During Stay, Before Checkout, On Checkout Day, After Checkout, Upon Inquiry, Upon Confirmed Reservation, Upon Cancellation, Upon Alteration or Upon Completing Checkin Form.
Where
Template Editor → Automation → Send Message AutomaticallyStep 3 Set the timing
For check-in instructions, choose Before Check-In and 1 day, and tick «Apply for last-minute booking» (closer than 1 day) so late bookers still get them. Set the send time; it follows the property's time zone.
Where
Template Editor → trigger settingsStep 4 Limit who gets it
Under «Send it only when reservation length», set Min and Max nights if the message only fits some stays. Under «Ignore for», tick «Back-to-back reservations with the same guest» so a guest who checks out and back in on the same day does not get it twice.
Where
Template Editor → Send it only when reservation length · Ignore forStep 5 Attach files and save
Attach images if you need them, then click Save.
Where
Template Editor → SaveStep 6 Check the Automation Timeline
Open the property's Message Templates list. The Automation Timeline shows every automatic message for that property and its trigger.
Where
Property Editor → General → Customize Message Templates
Try it in iGMS with your own listings for 14 days.No credit card required.
Start freeWhat should you see when it works?
Automatic messages carry an airplane icon in the Inbox, and the property's Automation Timeline lists each one with its trigger.
What if it does not work?
- A trigger set to 3 days before arrival sends only on that day, not at any time within the 3 days.
- Sending a template by hand stops its automatic send for that guest. iGMS warns you each time.
- To stop one automatic message, click its airplane icon in the Inbox and switch the trigger off. To stop it for one guest, use the toggle on the right of the conversation.
- To stop all automation for a property: Property Editor → General → Feature Settings, then switch off automation and inbox messages.
Frequently asked questions
Which booking sites do automatic messages work on?
Guests from Airbnb, Booking.com, Vrbo and direct bookings, through the unified inbox.
Can a message go to one property only?
Yes. Blue templates go to all guests; purple templates go only to guests of the properties you pick.
What time do automatic messages go out?
At the time you set, in the property's time zone.
Can I follow up after checkout?
Yes. Use the After Checkout trigger, for example a few days after the stay.
Use this recipe with your AI agent
Copy the prompt into ChatGPT, Claude or another assistant. It loads the recipe's Agent Skill and walks you through the steps while you click.
I manage vacation rentals in iGMS. Load the skill at https://www.igms.com/go/cookbook/automate-guest-messages/SKILL.md (or read https://www.igms.com/go/cookbook/automate-guest-messages.md) and walk me through «Automate guest messages with triggers» one step at a time. Ask me what I see on screen before each step, and stop if my screen differs from the recipe.
Related recipes
- Create · BeginnerCreate message templates with guest details filled in
- Set up · IntermediateSet up the AI Agent to answer guests overnight
Sources
Each step was written from the iGMS help centre on 19 November 2026. The help articles behind the steps are listed here.
| Step | Claim | Source | Status |
|---|---|---|---|
| Step 1 | Open the template you want to automate | help | In the help article |
| Step 2 | Switch on Automation and pick a trigger | help help app check | In the help article |
| Step 3 | Set the timing | help | In the help article |
| Step 4 | Limit who gets it | help app check | In the help article |
| Step 5 | Attach files and save | help | In the help article |
| Step 6 | Check the Automation Timeline | help app check | In the help article |